DIY Wood Pallet Shed: Affordable Outdoor Storage Solutions
Hey there, fellow DIY enthusiasts! Are you tired of that overflowing garage or cluttered backyard? Dreaming of a neat and tidy outdoor space but dreading the hefty price tag of a pre-built shed? Well, grab your tools and let's talk about building your own awesome shed using reclaimed wood pallets! It's cheaper, more eco-friendly, and surprisingly easier than you think. This guide will walk you through the entire process, from gathering materials to the final touches. Let's get started!
Planning Your Pallet Shed: Dream Big, But Start Small
Before you dive headfirst into this project, a little planning goes a long way. Think about what you'll be storing in your shed. Lawn tools? Gardening supplies? Bikes? The size and design of your shed should reflect your storage needs. Don't go overboard on your first project â€" a smaller shed is much easier to manage, especially if you're a beginner.
Choosing the Right Location
Pick a spot that's level, accessible, and ideally, close to a power source if you plan on adding any electricity later. Consider sun exposure and drainage â€" you don't want your shed to flood during a heavy rain!
Sketching Your Design
Even a simple sketch is helpful. Note the dimensions, door placement, and any windows you might want. You can find tons of inspiration online â€" Pinterest is a great resource! Don't be afraid to adapt designs to fit your needs and the pallets you have available.
Gathering Your Supplies
This is where the magic of repurposing comes in! Wood pallets are readily available â€" check with local businesses, construction sites, or even your friendly neighborhood hardware store (they often have discarded pallets). Beyond the pallets, you'll need:
- Measuring tape and level
- Hammer or nail gun
- Screws (longer ones are better for sturdiness)
- Saw (circular saw is ideal, but a hand saw works too)
- Safety glasses and gloves
- Post-hole diggers (if you're setting it on posts)
- Concrete mix (if you're setting it on a concrete base)
- Optional: Roofing material, paint, sealant, hinges, door handle, window frames
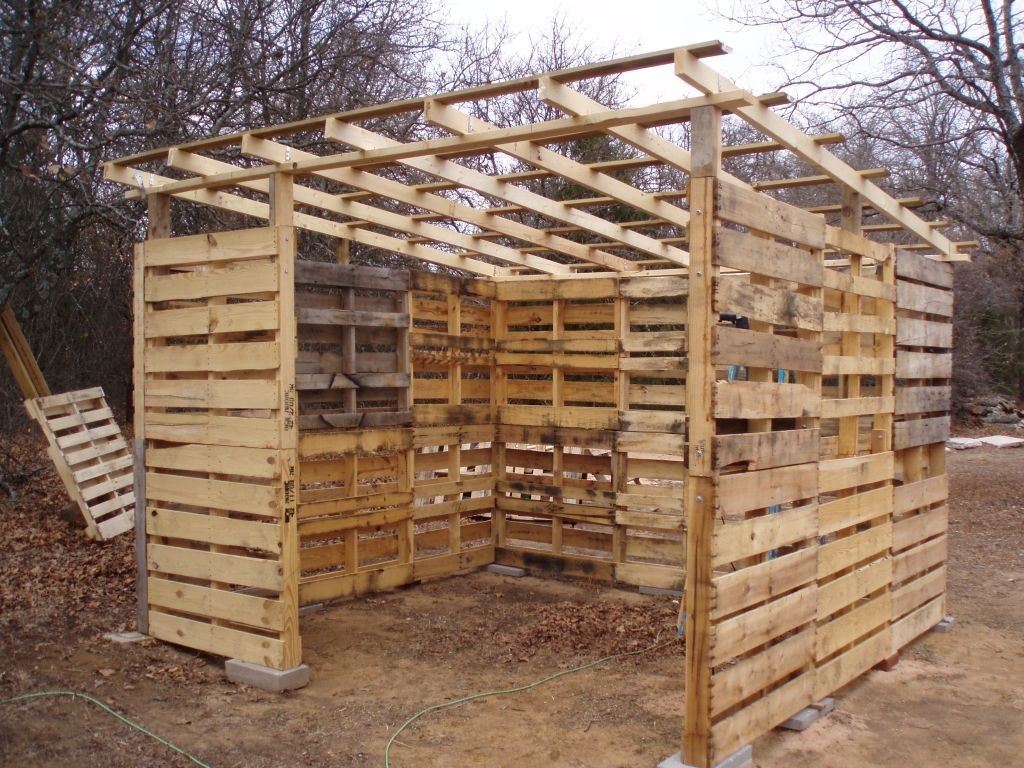
Building Your Pallet Shed: Step-by-Step
This part might seem daunting, but remember to take your time and enjoy the process. Each step builds upon the previous one, so accuracy is key.
Preparing the Pallets
Inspect your pallets carefully. Some may be damaged or have protruding nails. Remove any loose boards, nails, or debris. Sand down rough edges to prevent splinters. You can also clean them up with a pressure washer if you want a really clean look.
Building the Base
Your base is crucial for stability. You can create a simple base using more pallets, laying them flat and securing them together. Alternatively, consider a concrete slab for a more permanent and weather-resistant base. If you're going with a wooden base, ensure it's level.
Constructing the Walls
This is where your design comes to life. You'll be stacking and securing pallets vertically to form the walls. Use screws to fasten the pallets together, making sure the joints are strong and aligned. Consider adding extra bracing between pallets for added stability.
Adding the Roof
The roof can be simple or elaborate, depending on your skills and ambition. A simple gable roof is relatively easy to construct. You can use more pallets for the roof structure and cover it with roofing felt, corrugated metal, or even repurposed tarps for a more budget-friendly option.
Finishing Touches
Once the structure is up, it's time to add the finishing touches. Hang your door using strong hinges. Install a door handle. If you added windows, install those as well. You can paint your shed to match your house or give it a unique color. Sealing the wood will help protect it from the elements and prolong its lifespan.
Tips and Tricks for Pallet Shed Success
Building a pallet shed is a rewarding experience, but here are a few tips to make the process smoother:
- Start small: A smaller shed is much easier to manage for a first project.
- Check local regulations: Make sure your shed complies with local building codes and zoning laws.
- Safety first: Wear safety glasses and gloves throughout the project.
- Pre-drill holes: This prevents the wood from splitting when you screw it together.
- Use strong screws: Opt for longer screws for better stability.
- Don’t be afraid to ask for help: Enlist a friend or family member to assist with lifting and securing heavy pallets.
- Have fun!: Enjoy the process of building something with your own hands!
Frequently Asked Questions (FAQs)
Here are some common questions people have about building pallet sheds:
Q: Are all pallets safe to use?
A: No. Some pallets are treated with chemicals, making them unsuitable for use in construction. Look for heat-treated pallets (HT) which are safe. Avoid pallets marked with MB (methyl bromide) as this is a hazardous chemical.
Q: How long will a pallet shed last?
A: With proper construction and maintenance (sealing, painting), a well-built pallet shed can last for several years. The lifespan depends on the quality of the pallets, the climate, and how well it's protected from the elements.
Q: Can I add electricity to my pallet shed?
A: Yes, but you'll need to ensure it's done safely and according to electrical codes. Consult a qualified electrician.
Q: What if I don't have any carpentry skills?
A: Don't worry! Plenty of online resources and tutorials can guide you. Start with a simple design, and take your time. You can always adjust as you go. The beauty of a DIY project is the learning process!
Q: How much will this cost?
A: The cost depends largely on the size of your shed and the materials you use. If you source your pallets for free or at a low cost, the overall expense can be significantly lower than a pre-built shed. Expect to spend mainly on screws, hinges, and possibly roofing materials.
So there you have it! Building your own pallet shed is a fantastic way to add valuable storage space to your property without breaking the bank. Remember to plan carefully, prioritize safety, and most importantly, have fun! Happy building!
0 comments:
Post a Comment