Compact and Simple 8x6 Shed Plans for Garden Enthusiasts
This document provides comprehensive plans for constructing a compact and functional 8x6 shed, ideal for the discerning garden enthusiast. The design prioritizes simplicity and ease of construction, making it suitable for DIY enthusiasts with moderate woodworking experience. Detailed specifications and step-by-step instructions are provided to ensure a successful project outcome. The shed offers ample storage for gardening tools, equipment, and supplies, while its modest footprint minimizes its impact on the garden’s aesthetic appeal.
I. Foundation and Site Preparation
Before commencing construction, meticulous site preparation is crucial for a stable and long-lasting shed. Careful consideration of the chosen location and ground conditions will ensure the shed’s longevity and structural integrity. The 8x6 footprint requires a relatively small area, allowing flexibility in placement within the garden. However, ensuring adequate access for materials and tools during construction is paramount.
A. Site Selection and Leveling
Select a level, well-drained location that receives adequate sunlight for drying tools and equipment. Avoid areas prone to flooding or excessive shade. Clear the designated area of any vegetation, rocks, or debris. Use a level to ensure the ground is perfectly level. Any significant discrepancies in elevation should be addressed by excavating high points or filling low points with compacted gravel or topsoil.
B. Foundation Options
Several foundation options are suitable for this shed, each offering varying levels of complexity and cost-effectiveness:
- Concrete Slab: Provides the most robust and permanent foundation. Requires professional pouring or significant DIY experience. Ensures excellent stability and protection against ground moisture.
- Gravel Base: A cost-effective and relatively simple option. Involves excavating a shallow trench, filling it with compacted gravel, and leveling the surface. Offers good drainage but less stability than a concrete slab.
- Pressure-Treated Timber Base: A simple and readily available solution. Requires constructing a frame from pressure-treated timber, ensuring the timber is properly treated against rot and insect infestation. Offers good stability and drainage, but may require periodic maintenance.
II. Materials List and Procurement
Accurate material procurement is essential for efficient construction and cost management. The following list outlines the necessary materials; quantities may need adjustment based on specific design choices and material availability.
A. Timber
- Pressure-treated 4x4 posts for the base frame (adjust quantity based on chosen foundation).
- Pressure-treated 2x4 studs for the wall framing.
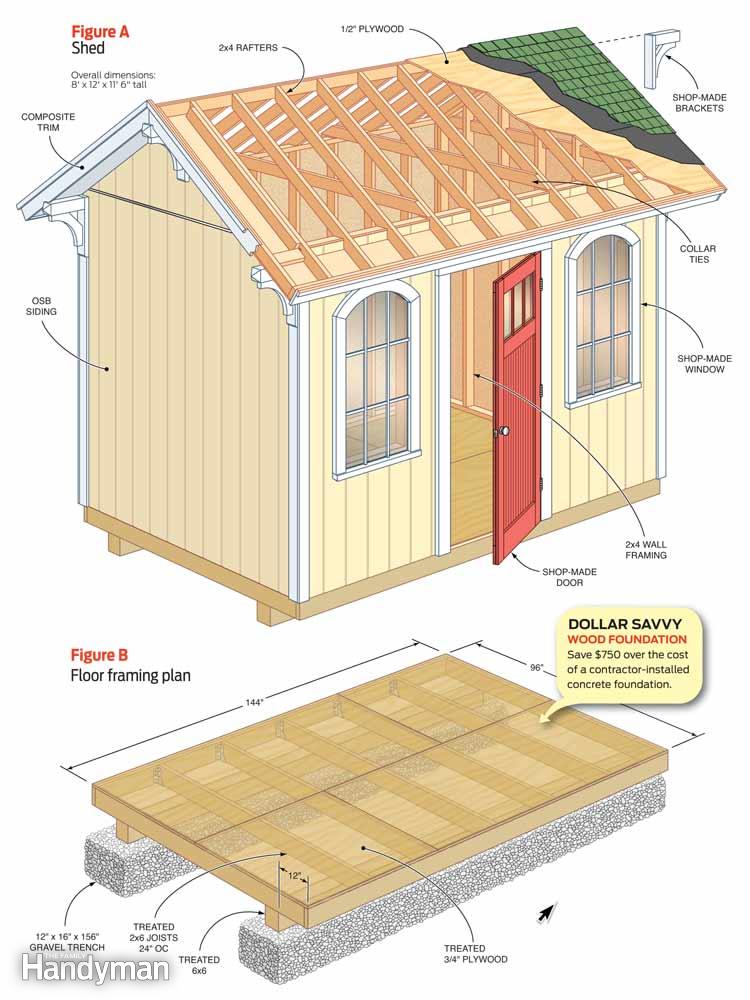
- Pressure-treated 2x6 floor joists.
- Plywood or OSB sheathing for the floor and walls.
- Roofing timber (e.g., 2x4 rafters).
- Roofing boards (e.g., plywood or OSB).
B. Fasteners and Hardware
- Galvanized nails or screws of appropriate size for timber.
- Concrete screws or anchors (if using a concrete foundation).
- Roofing nails or screws.
- Hinges for the door.
- Door handle and latch.
- Window hardware (if applicable).
C. Roofing Materials
- Roofing felt or underlayment.
- Chosen roofing material (e.g., asphalt shingles, corrugated metal).
D. Other Materials
- Paints, stains, or sealants for exterior protection.
- Gravel or compacted soil (for gravel base foundation).
- Concrete mix (for concrete slab foundation).
III. Construction Process
The construction process is divided into several distinct phases, each requiring careful attention to detail. Accurate measurements and precise cuts are crucial for a structurally sound and aesthetically pleasing shed.
A. Base Frame Construction
Construct a rectangular base frame using the 4x4 posts, ensuring squareness and levelness. Secure the corners using appropriate fasteners and bracing. If using a concrete slab, anchor the frame to the slab. If using a gravel base, ensure the frame is level and stable on the compacted gravel. For a timber base, construct a similar frame from pressure-treated timber, ensuring the timber is properly spaced for good drainage.
B. Floor Construction
Lay the floor joists across the base frame, spaced appropriately for the chosen flooring material. Secure the joists using nails or screws. Install the plywood or OSB sheathing, ensuring tight joints and proper fastening. Ensure the floor is level and stable.
C. Wall Framing
Construct the wall frames using 2x4 studs, ensuring proper spacing and alignment. Attach the wall frames to the base frame, ensuring plumbness and squareness. Install the sheathing, ensuring tight joints and proper fastening.
D. Roof Construction
Construct the roof rafters, ensuring proper spacing and support. Attach the rafters to the wall frames, ensuring proper slope and alignment. Install the roofing boards, ensuring tight joints and proper fastening. Apply roofing felt or underlayment, followed by the chosen roofing material.
E. Door and Window Installation
Install the door and any windows, ensuring proper alignment and functionality. Secure the door hinges and handle, and install the window hardware.
F. Finishing and Exterior Protection
Apply paint, stain, or sealant to protect the timber from the elements. This will significantly extend the shed’s lifespan and enhance its aesthetic appeal.
IV. Safety Precautions
Safety should be a paramount concern throughout the construction process. Wear appropriate safety gear, including safety glasses, gloves, and hearing protection. Use caution when working with power tools and sharp objects. Ensure the work area is well-lit and free of obstructions. Follow all manufacturer’s instructions for tools and materials. Seek professional assistance if needed for tasks beyond your skill level.
This comprehensive guide provides a detailed framework for building an 8x6 shed. Remember that adapting these plans to your specific needs and preferences is crucial for a successful outcome. Always prioritize safety and take your time to ensure a structurally sound and aesthetically pleasing garden shed.
0 comments:
Post a Comment